Quick Answer #
In Gift Registry Guru, go to Dashboard > Add to Registry Button Appearance > Configure, then choose where the registry icon should appear: on the product image, beside the product title, or beside the Add to Cart button. Each location has its own position and visibility options.
Give shoppers the flexibility to add products to their gift registry exactly where it feels natural on the page. With Gift Registry Guru, you can display the Add to Registry icon in multiple spots on your product page — helping improve engagement, registry sign-ups, and conversions.
Steps to Configure Add to Registry Icon Placement #
- Go to your Gift Registry Guru Dashboard.
- Scroll down and locate “Add to Registry Button Appearance.”
- Click on the Configure button.
- Choose where you want to display the Add to Registry icon:
- Product image
- Beside product title
- Beside Add to Cart button
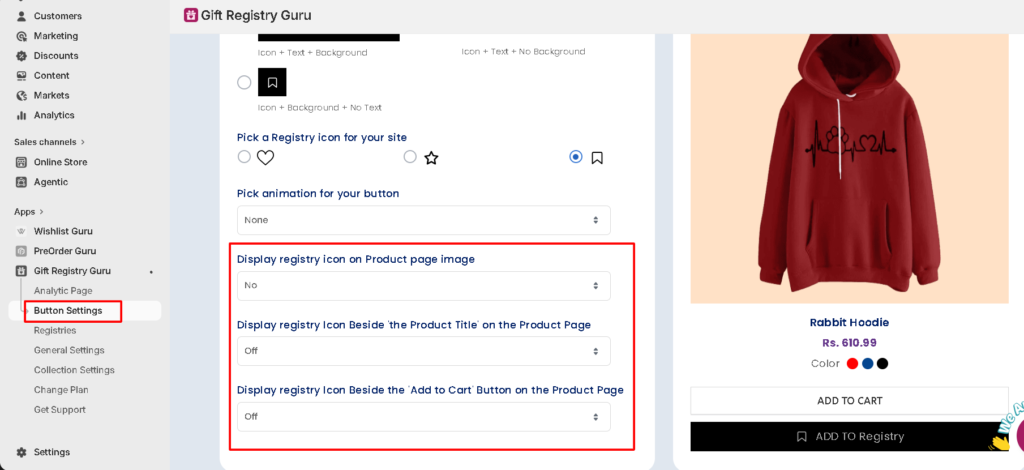
Display the Add to Registry Icon on the Product Image #
You can enable or disable the Add to Registry icon directly on the main product image, similar to how it appears on your collection pages.
Options:
- Yes
- No
Icon Position:
- Top Left
- Top Right
- Bottom Left
- Bottom Right
👉 You can customize the icon’s appearance (style, color, and shape) from the Collection Settings page, since the product page icon mirrors the collection page design.
Display the Add to Registry Icon Beside the Product Title #
For a cleaner, more minimal layout, you can show the Add to Registry icon directly next to the product title.
Options:
- Left side of the title
- Right side of the title
- Off
👉 This placement works best for stores that want a subtle, non-intrusive way to let shoppers add items to their registry without disrupting the product page design.
Display the Add to Registry Icon Beside the Add to Cart Button #
You can place the Add to Registry icon right next to the Add to Cart button to capture shoppers at the moment of highest purchase intent.
Options:
- Left side of the Add to Cart button
- Right side of the Add to Cart button
- Off
👉 This is one of the most effective placements for boosting registry additions, since customers can save an item to their registry in the same action as adding it to their cart.
Note: The Add to Registry icon on the product page follows the same design as the icon on your collection pages. To change the icon’s style, color, or shape, update it from your Collection Page Settings — the changes will automatically apply to your product page icon as well.
Frequently Asked Questions #
Can I show the Add to Registry icon in more than one location on the product page?
Yes. You can enable the icon on the product image, beside the title, and beside the Add to Cart button at the same time — each location is controlled independently.
Why does changing the icon style on the product page not seem to work?
The product page icon inherits its design from your Collection Page Settings. To change how it looks (color, shape, or style), update the icon from the Collection page settings rather than the product page settings.
Which placement is best for increasing registry add-ons?
Placing the Add to Registry icon beside the Add to Cart button tends to perform best, since it puts the option in front of shoppers at the moment they’re already deciding to purchase.
Can I turn off the Add to Registry icon on the product page entirely?
Yes. Set each placement option (product image, title, Add to Cart) to No or Off to hide the icon from those areas of the product page.


