Quick Answer #
To customize the registry notification, go to Gift Registry Guru > General Settings > Notification Settings. Choose whether to show the registry page or a notification after an item is added, select the notification type (Tooltip, Toast, or Text), set the position and delay timer, and style the notification’s colors, font, padding, and border to match your store.
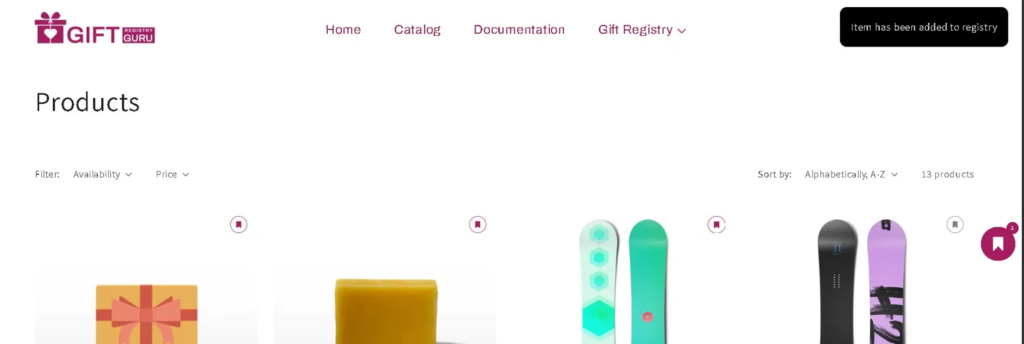
When a shopper adds a product to their gift registry, Gift Registry Guru can show them a confirmation notification — reassuring them the item was saved successfully. You have full control over how this notification looks and behaves, from the notification type and screen position to colors, font size, and how long it stays visible. This guide walks you through every setting on the Notification Settings page.
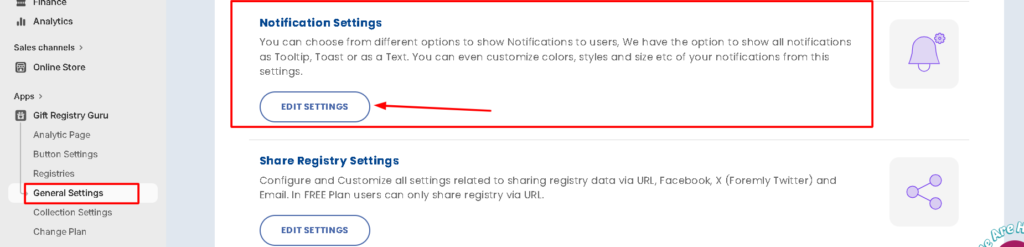
How to Open Notification Settings #
- Log in to your Shopify Admin.
- In the left-hand navigation, go to Apps > Gift Registry Guru.
- Click General Settings in the Gift Registry Guru left-hand menu.
- Select Notification Settings.
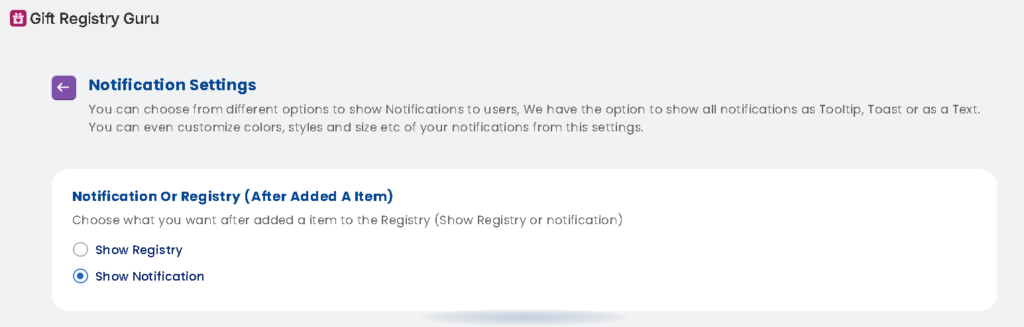
Notification or Registry After Adding an Item #
The first setting controls what happens immediately after a shopper clicks the Add to Registry button on a product or collection page.
Choose one of the following:
- Show Registry — redirects the shopper directly to their registry page after adding an item, so they can see their full list straight away.
- Show Notification — displays a confirmation notification (Tooltip, Toast, or Text) on the current page, letting the shopper continue browsing without leaving the page. (Selected by default)
Tip: Show Notification is recommended for most stores — it keeps shoppers on the product or collection page so they can continue adding items to their registry without interruption.
Notification Type #
If Show Notification is selected, choose which type of notification to display:
As a Tooltip A small popup appears near the Add to Registry button when the item is added. Tooltips are subtle and contextual, appearing right where the action happened.
As a Toast (selected by default) A notification banner slides in from a chosen position on the screen (top or bottom). This is the most commonly used notification style and is clearly visible without disrupting the shopper’s browsing experience.
As a Text A simple inline text message appears on the page confirming the item has been added. This is the most minimal option and works well for stores that prefer a clean, low-distraction design.

Notification Delay Timer #
The Notification Delay Timer controls how long the notification stays visible on screen before it automatically disappears.
- Enter the duration in seconds.
- Default value: 2 seconds
You can increase this if you want the notification to stay visible longer — for example, set it to 4 or 5 seconds if your notification includes a longer message or a link to the registry.
Toast Notification Position #
If As a Toast is selected, you can choose exactly where on the screen the notification appears. The available positions are:
- Top Center of the screen
- Top Left of the screen
- Top Right of the screen (selected by default)
- Bottom Center of the screen
- Bottom Left of the screen
- Bottom Right of the screen
Tip: Top Right is the default and most recognizable position for toast notifications — shoppers are familiar with seeing confirmation messages appear there, making it the most intuitive choice for most stores.
Styles for Notification (Tooltip & Toast) #
This section lets you fully customize the appearance of the notification to match your store’s branding. Settings are split into two columns — Notification Settings (background and layout) and Notification Text Settings (typography).
Notification Settings #
- Pick a color for the Background — Set the background color of the notification using a hex code. Default:
#000000(black) - Border Radius — Set the corner roundness of the notification box in pixels. Default:
10px - Padding (Top & Bottom) — Set the vertical padding inside the notification. Default:
15px - Padding (Left & Right) — Set the horizontal padding inside the notification. Default:
15px - Margin (Top & Bottom) — Set the vertical spacing outside the notification. Default:
0px - Margin (Left & Right) — Set the horizontal spacing outside the notification. Default:
0px - Border — Set the border width, style (e.g., Solid), and color of the notification box. Default:
1px Solid #000000
Notification Text Settings #
- Font Size — Set the size of the notification text in pixels. Default:
15px - Text Color — Set the color of the notification text using a hex code. Default:
#FFFFFF(white) - Font Family — Set the font used in the notification. Shopify default font family works only.
- Text Align — Set the alignment of the notification text. Default:
Center
Note: Always click Save in the top right corner after making any changes to apply them to your live storefront.
Frequently Asked Questions #
Where do I find the Notification Settings in Gift Registry Guru?
Go to Shopify Admin > Apps > Gift Registry Guru > General Settings > Notification Settings.
What is the difference between a Tooltip, Toast, and Text notification?
A Tooltip appears near the Add to Registry button itself. A Toast is a banner that slides in from a position on the screen (top or bottom). A Text notification is a simple inline message on the page. Toast is the most visible and commonly used option.
Can I change how long the notification stays on screen?
Yes. Use the Notification Delay Timer field to set how many seconds the notification stays visible before automatically disappearing. The default is 2 seconds.
Can I change the notification background color from black to my brand color?
Yes. In the Styles for Notification section, use the Pick a color for the Background field to enter any hex color code that matches your store’s branding.
Can I show the registry page instead of a notification after an item is added?
Yes. In the Notification or Registry After Adding an Item section, select Show Registry instead of Show Notification. This will redirect the shopper to their registry page immediately after adding a product.
Will the notification appear on both product pages and collection pages?
Yes. The registry notification appears whenever a shopper adds an item to their registry, regardless of whether they click the Add to Registry button on a product page or a collection page.


