Quick Answer #
To enable the floating Gift Registry icon, go to your Gift Registry Guru Dashboard > Registry Icon Location > Configure, then select “As a floating icon button” and click Save. From the same settings page you can customize the icon’s position (bottom right, bottom left, mid-left, mid-right), style, and colors.
The floating (sticky) Gift Registry icon stays visible to shoppers as they scroll through any page on your store, making it easy for them to jump back to their registry at any time. It’s a subtle but effective way to keep the gift registry experience front of mind without taking up permanent space in your header or navigation. With Gift Registry Guru, you can enable, hide, and fully customize the floating icon in just a few steps.
How to Enable the Floating Gift Registry Icon #
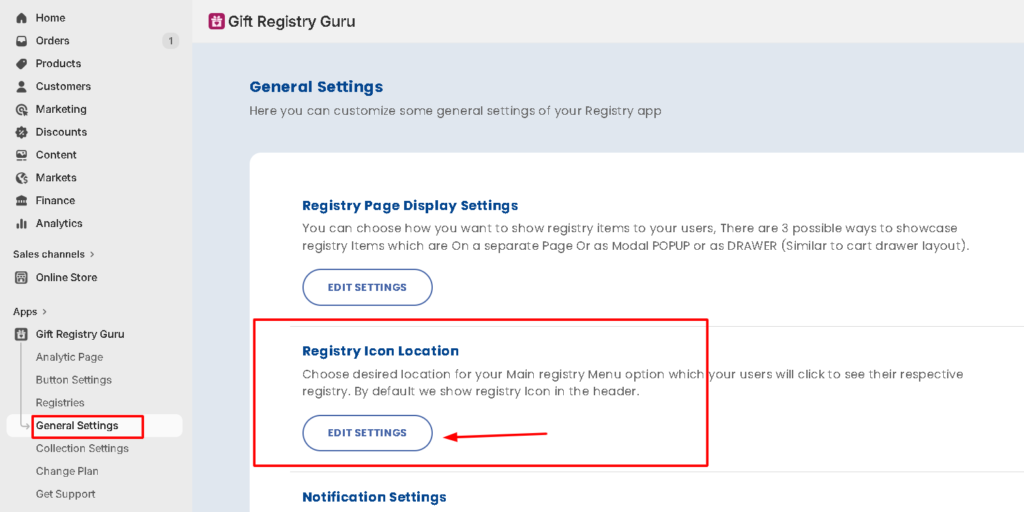
- Go to your Gift Registry Guru Dashboard or General Settings
- Scroll down to the Registry Icon Location section.
- Click Configure.
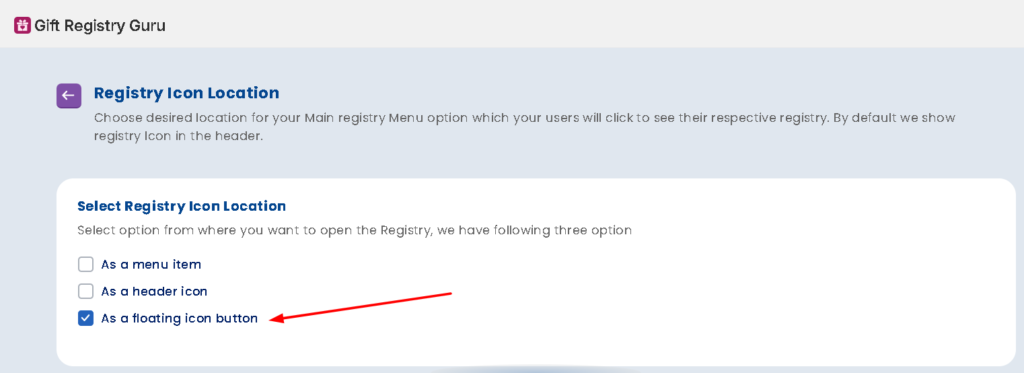
- On the settings page that appears, select “As a floating icon button”.
- Click Save (top right corner) to apply the changes.
The floating Gift Registry icon will now appear on your storefront, staying fixed in your chosen position as shoppers scroll through any page.
How to Customize the Floating Icon and Its Position #
After enabling the floating icon, use the customization options on the same settings page to adjust its appearance and placement:
- Icon Style – Choose the icon design that best fits your store’s aesthetic.
- Icon Color – Set the icon color using a hex code to match your branding.
- Background Color – Set the background color of the floating icon button.
- Icon Size – Adjust the size of the floating icon to make it more or less prominent.
- Floating Icon Position – Choose where the icon appears on the screen (see options below).
- Icon Shape – Set the icon shape in a circle or square.
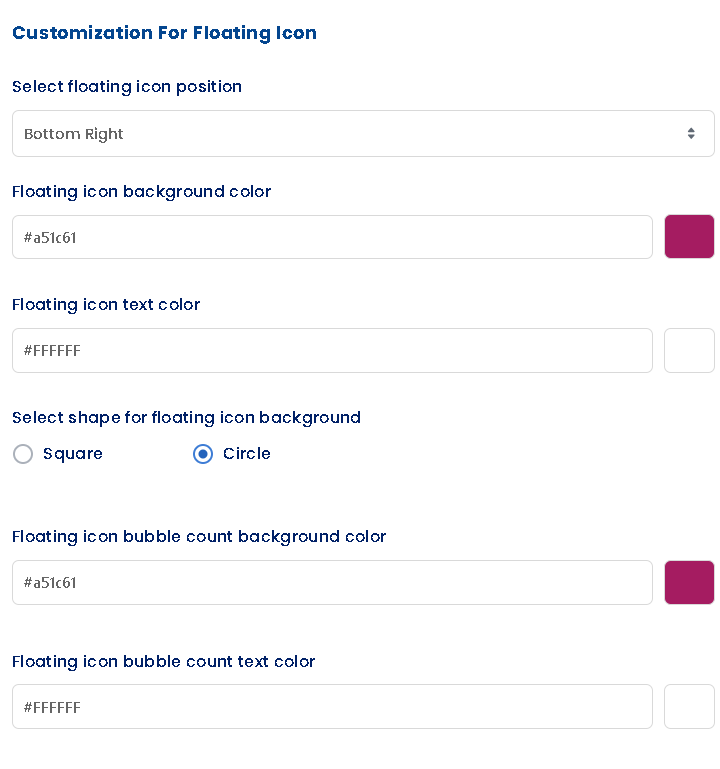
Note: Always click Save in the top right corner after adjusting the floating icon settings to apply the changes to your live storefront.
How to Hide the Floating Icon #
If you don’t want the floating icon to appear on your storefront — for example, if you’re using the header icon instead — you can hide it:
- Go to Dashboard > Registry Icon Location > Configure.
- Deselect the “As a floating icon button” option, or select a different display option (header icon or menu item).
- Click Save.
The floating icon will no longer appear on your storefront.
Frequently Asked Questions #
What’s the difference between the floating icon and the header icon?
The header icon is fixed in your store’s header and always visible at the top of the page. The floating (sticky) icon follows the shopper as they scroll and can be positioned in a corner or along the side of the screen. You can enable one or both at the same time.
Can I enable both the header icon and the floating icon at the same time?
Yes. You can use both placements simultaneously if you want maximum visibility for the registry icon across your storefront.
Which floating icon position works best?
Bottom right is the most effective position for most stores, as shoppers are accustomed to finding sticky action buttons (like live chat) there. If you have a live chat widget in the bottom right, use bottom left or mid right to avoid overlap.
Will the floating icon appear on every page of my store?
Yes. Once enabled, the floating icon appears on all pages of your storefront so shoppers always have quick access to their registry.
Can I change the floating icon’s color to match my store theme?
Yes. Use the Icon Color and Background Color settings in the floating icon configuration to set custom hex colors that match your store’s branding.


