After installing Gift Registry Guru, your customers need a way to access their registry from your storefront. The most effective place to put this is your store’s main navigation menu — it’s visible on every page and drives the highest engagement.
Gift Registry Guru gives you two ways to add a registry link to your main menu:
- Method 1 – Automatic (via app settings): The app injects a single registry link into your menu automatically. Quickest option.
- Method 2 – Manual (via Shopify Navigation): You create a custom dropdown menu with separate pages for Create, Manage, and Find a Registry. Best for stores that want a polished, structured navigation experience.
Choose the method that fits your store’s needs. Both are covered below.
Method 1 – Automatic Menu Injection (Via App Settings) #
This is the fastest way to add Gift Registry Guru to your navigation. The app adds a registry link to your main menu automatically — no Shopify navigation editing required.
Step 1 – Open General Settings #
From your Gift Registry Guru admin panel, navigate to General Settings.
Step 2 – Find Registry Icon Location #
Scroll down to find the Registry Icon Location section and click Edit Settings.
You’ll see three placement options:
- As a menu item
- As a header icon
- As a floating icon button
Step 3 – Enable “As a Menu Item” #
Tick the checkbox next to As a menu item.
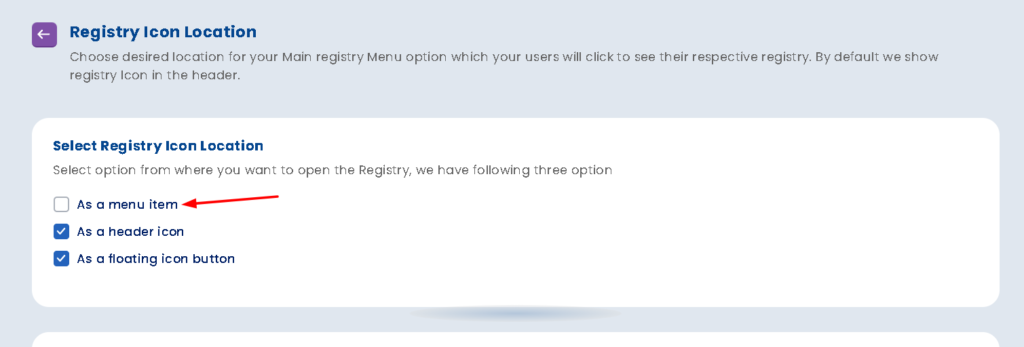
💡 Once checked, Gift Registry Guru will automatically inject a “Gift Registry” link into your store’s main navigation menu. No further action needed.
Step 4 – Save Your Settings #
Click Save. Visit your storefront to confirm the registry link appears in your main menu.
⚠️ Important: If you later decide to switch to Method 2 (manual dropdown), come back here and untick this checkbox first — otherwise you’ll end up with duplicate menu items.
Method 2 – Manual Dropdown Menu with Separate Registry Pages (Via Shopify Navigation) #
This method gives you full control. Instead of a single registry link, your main menu will display a dropdown with three separate landing pages:
| Menu Item | What It Does |
|---|---|
| Create a Registry | Takes customers to the registry creation page |
| Find a Registry | Lets guests search for someone’s registry |
| Manage Registries | Lets logged-in customers view and edit their registries |
This is the recommended approach for stores that want a professional, fully structured navigation experience.
Step 1 – Disable Automatic Menu Injection (If Previously Enabled) #
If you previously enabled Method 1, go back to General Settings → Registry Icon Location and untick the “As a menu item” checkbox. Save your settings.
This prevents a duplicate “Gift Registry” item from appearing alongside the dropdown you’re about to create.
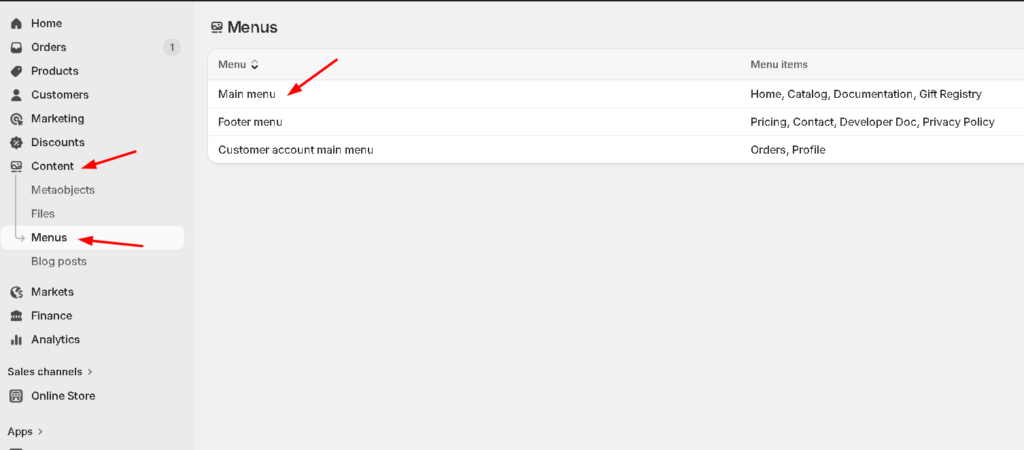
Step 2 – Open Your Shopify Navigation Menu #
- In your Shopify Admin, click Content in the left sidebar
- Click Menus
- Select Main menu (this controls what appears in your store’s header navigation)
Step 3 – Create a “Gift Registry” Parent Menu Item #
On the Main menu page, click Add menu item. Name it Gift Registry. This will be the top-level label that your customers click to reveal the dropdown.
For the link field, you can set it to /apps/wf-gift-registry/create or leave it as a non-linked parent — either works.
Click Add to save the parent item.
Step 4 – Add the Three Sub-Menu Items #
Now add three child items nested under the Gift Registry parent. For each one, click Add menu item to Gift Registry and use the exact URLs below:
Sub-item 1 – Create a Registry
- Name: Create a Registry
- Link:
/apps/wf-gift-registry/create
Sub-item 2 – Find a Registry
- Name: Find a Registry
- Link:
/apps/wf-gift-registry/find
Sub-item 3 – Manage Registries
- Name: Manage Registries
- Link:
/apps/wf-gift-registry/list
Your menu structure should look like this when done:
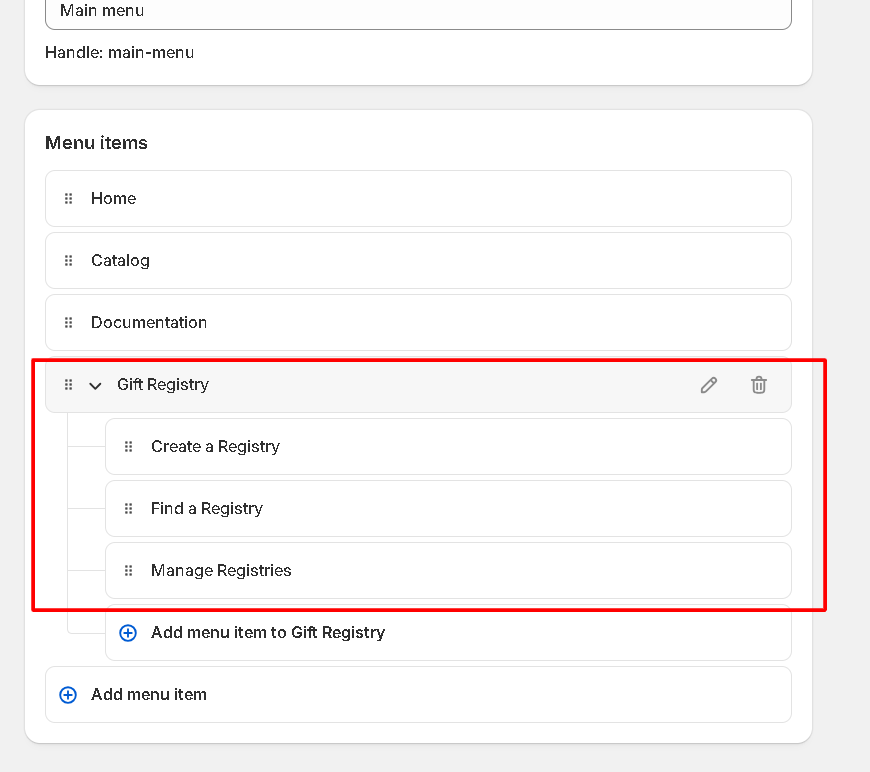
💡 Tip: The order of sub-items can be rearranged by dragging. Most stores place “Create a Registry” first since it’s the action new customers take most.
Step 5 – Save Your Menu #
Click Save menu at the top right of the Shopify navigation editor.
Which Method Should I Use? #
| Method 1 – Automatic | Method 2 – Manual Dropdown | |
|---|---|---|
| Setup time | Under 1 minute | 3–5 minutes |
| Navigation style | Single link | Dropdown with 3 pages |
| Best for | Quick launch, simple stores | Stores wanting structured UX |
| Customization | Limited | Full control over labels & order |
| Requires Shopify navigation editing | No | Yes |
Most growing stores start with Method 1 and switch to Method 2 as they want more control over the customer journey.
Frequently Asked Questions #
Can I rename the menu items to something other than “Gift Registry”?
Yes. The labels (“Create a Registry”, “Find a Registry”, etc.) are just display names — you can call them anything you like. Only the URL paths matter for the pages to work correctly.
Can I add the registry menu to my footer as well?
Yes. Follow the same steps in Method 2 but select Footer menu instead of Main menu in Step 2.
Will the registry menu work on mobile?
Yes. Shopify’s responsive navigation system handles mobile display automatically. The Gift Registry dropdown will appear as a collapsible section in your mobile menu.
What if I want the registry link in the header icon AND as a menu item?
You can enable both at the same time. Just check both “As a menu item” and “As a header icon” in your Registry Icon Location settings.
Do I need to re-add the menu if I change my Shopify theme?
If you switch themes, navigation menus are preserved in Shopify’s backend — you won’t need to recreate them. However, you may need to re-enable the app embed in your new theme (see the setup guide).


